Flutter Animated Logo with CustomPainter
FlutterLogo is a really handy widget. But what if we want to have it animated like in some of the Flutter team videos? We can try to do it with Rive, but let’s challenge ourselves and do it in pure Dart.
You can check out the final result in the #FlutterPen below:
See the Pen Animated Flutter Logo - @orestesgaolin by Dominik Roszkowski (@orestesgaolin) on CodePen.
Introduction
Let’s figure out what are the main components of Flutter logo. The letter F consists of 3 beams (2 light blue parallel and 1 dark perpendicular). There’s also a subtle shadow beneath the middle beam dropping onto the leg of the letter. It’s relatively easy to draw the shapes with Paths. We can use the original FlutterLogo widget as a reference.
![]()
In order to check how the original FlutterLogo is implemented let’s go to the flutter_logo.dart file in material library. We can immediately see that it’s using AnimatedContainer’s decoration to draw logo with CustomPainter. In my proof of concept I decided that I won’t use decoration to simplify the animation process.
The most useful part is available in _paintLogo method of _FlutterLogoPainter. It stores coordinates of the FlutterLogo that we’re going to use to draw our version of Flutter logo. Most of them will remain unchanged but we will draw the middle beam a bit differently.
In original logo this part is a rotated square painted with Colors.blue[400], whereas in our case it’s going to be a result of overlaying Colors.blue[400].withOpacity(0.8) onto Colors.blue[900]. Take a look how it looks like during the middle beam rotation.
![]()
There are some other small changes in the design but I won’t focus on them as most of them are really subtle (e.g. one shadow gradient instead of two as in the original design).
Right now we more or less know how to draw the Flutter logo. We’re going to use CustomPainter and we’ll base our Paths on the original design and colors. But how are we going to animate it?
Implementing complex animations by breaking them down
Whenever we try to implement some complex animations in Flutter it’s worth to apply Marcin Szalek’s principle of breaking down complex animations into series of basic ones. Let’s take a look at the original Flutter logo animation available in the official assets.
![]()
Here we can see several things happening at the same time or in a sequence:
- Middle beam revealing from bottom
- Middle beam rotating around the lower leg with some perspective change
- Middle beam flipping around its longer axis when rotated by 90 degrees (this was a surprise!)
- Shadow animating/revealing as the middle beam is approaching the canvas plane
- Lower leg revealing from top
- Top of lower leg following the leg with a slight delay
- Top beam revealing from bottom
- Top beam and middle beam falling down onto a canvas (slight size change)
It’s almost impossible to keep track of all of these animations in your head so we need to extract them and write down all the timing parameters. Fortunately you can use some tools to split GIFs into separate frames and analyze them manually. On macOS you can just open the GIF in default Preview app to see all the frames one by one.
Now the only thing to do is to take a piece of paper and write down each frame numbers of each part. Easy, isn’t it? (You can check out my parameters in the source code)

Staggered animation
After meticulous analysis of the animation we can start preparing some tweens to provide them to the CustomPainter. After creating all of them it may be a good idea to extract it to separate class (e.g. FlutterLogoController) because right now it may be hard to separate code related to animation from widgets’ code.
I assumed that the logo animation will occupy 60% of the whole AnimationController. It will be equivalent to the 140 frames of the GIF above. For instance the top beam clip is one of the last animations. We can describe the clip position by a single variable.
By using Interval as curve for CurvedAnimation we can select only the desired interval (frames 100-140). Let’s use Curves.easeOutCubic to make its dynamics similar to the original animation.
//frames 100-140
topBeamClip = Tween<double>(begin: 1.0, end: 0.0).animate(
  CurvedAnimation(
    parent: animationController,
    curve: Interval(
      100 / tf * animLimit,
      140 / tf * animLimit,
      curve: Curves.easeOutCubic,
    ),
  ),
);
Now just repeat this for all the parameters of the animation like opacity, rotation, clipping…
Having all the necessary timing and size parameters let’s try to draw the logo.
Drawing the logo
We’re going to use a single CustomPainter. In Flutter it’s extremely easy to start drawing custom shapes and paths. Just create new class that extends CustomPainter and overwrite two methods: paint(Canvas canvas, Size size) and shouldRepaint(CustomPainter oldDelegate). We want CustomPainter to redraw animation on each frame so let’s return true from shouldRepaint.
class AnimatedLogoPainter extends CustomPainter {
  @override
  void paint(Canvas canvas, Size size) {
    // here we will draw our logo
  }

  @override
  bool shouldRepaint(CustomPainter oldDelegate) {
    return true;
  }
}
First let’s position and scale our canvas so that the logo is always in the center. From the original source code we know that logo’s coordinate space is 166x202 px. The logo should be translated by a margin so that it’s centered in x axis (this distance is (202.0 - 166.0) / 2.0).
void paint(Canvas canvas, Size size) {
  final rect = Rect.fromLTWH(0, 0, size.width, size.height);
  // Coordinate space is 166x202 px
  // so we transform canvas and place it in the middle
  canvas.save();
  canvas.translate(rect.left, rect.top);
  canvas.scale(rect.width / 202.0, rect.height / 202.0);
  // Next, offset it some more so that the 166 horizontal pixels are centered
  // in that square (as opposed to being on the left side of it). This means
  // that if we draw in the rectangle from 0,0 to 166,202, we are drawing in
  // the center of the given rect.
  canvas.translate((202.0 - 166.0) / 2.0, 0.0);
  // ...
  canvas.restore();
}
Notice that I’m using canvas.save() method that saves the current canvas operations until the corresponding canvas.restore(). It’s useful if you want to apply several operations (e.g. translation, rotation, clipping) to a selected part/layer of the painting; Each canvas.save() must have closing canvas.restore() method. You can nest them to apply operations to subparts of your canvas and in general I recommend to save a snapshot before drawing each new part of the image. This allows to mentally “separate” operations done to given path or shape.
Drawing a path
In this article let’s just focus on one part of the Flutter logo. You can always check out the source code to see how all of the parts were implemented.
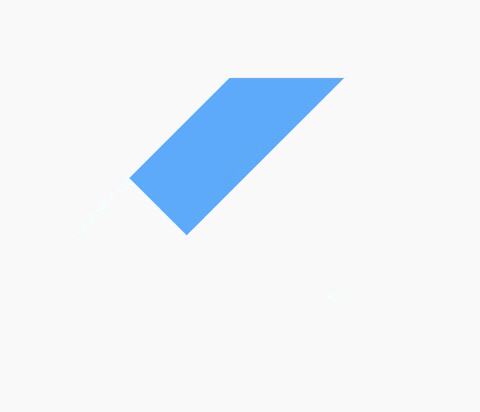
Let’s see how the middle beam was drawn. It’s the most interesting part and we’ll see how it was animated later in the article.
final lightPaint = Paint()..color = Colors.blue[400].withOpacity(0.8);
final Path middleBeam = Path()
  ..moveTo(156.2, 94.0)
  ..lineTo(100.4, 94.0)
  ..lineTo(51.6, 142.8)
  ..lineTo(79.5, 170.7);

canvas.drawPath(middleBeam, lightPaint);
canvas.restore();
We used known coordinates to draw a path and then painted it with lightPaint that by default is filling the bounded area with defined color. The path is closed automatically.

Rotations
The most complicated part of the Flutter logo animation was rotation of the middle beam. It’s not a simple rotation by x or y axis. Firstly, the middle beam is approaching from the bottom left. Then while the top edge is touching the bottom (dark) leg, the rotations around this edge starts. When the beam is perpendicular to the canvas plane there’s an orientation flip. Take a look at the diagram below.
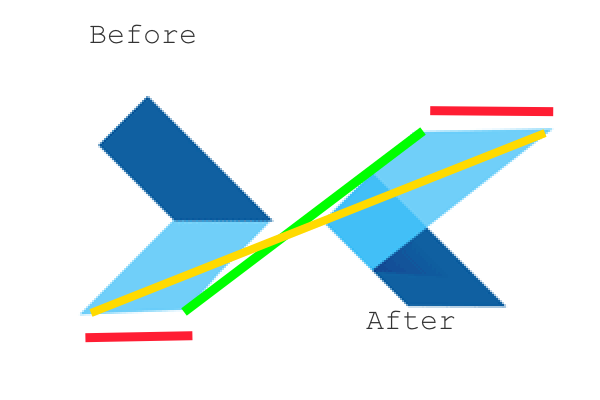
When researching ways to rotate objects on Flutter canvas I couldn’t find a way to easily manipulate it around arbitrary axis. Perhaps it’s possible by combining several transformations (e.g. firstly rotating canvas by 45 degrees and then by one of the primary axes), but I tried to figure out the exact Matrix transformation that is necessary to achieve these rotations.
Rotation around arbitrary axis
I found several math equations that allow to rotate given point around arbitrary axis. The best explanation along with the source code in Java I found on Glenn Murray’s page. Glenn published its Java implementation on Apache license so I decided to port one of the rotation methods to Dart. It was fairly easy to port and the packaged version is available on pub.dev.
In the animation below you can see the small difference if we don’t rotate the beam around its axis when the beam is perpendicular to the canvas.

With the rotation library it’s relatively easy to flip the object. The axis of rotation is
[-1.0, 1.0, 0.0] and the object is rotated around point [93.45, 128.85, 0.0] which is in the middle of beam edge. We use the rotation matrix values to transform canvas with canvas.transform(). The beamRotation parameter is value of Tween being used to rotate the beam around its edge.
if (beamRotation > math.pi / 2) {
  // flip the middle beam when on the left side (i.e. rotation angle larger that 90 degrees)
  final rot2 = RotationMatrix(93.45, 128.85, 0.0, -1, 1, 0.0, math.pi);
  final mtx2 = rot2.getMatrix();
  canvas.transform(mtx2);
}
Now let’s focus on rotating the middle beam around its edge. The code for that is even simpler but makes a lot of difference:
final rot = RotationMatrix(79.5, 170.7, 0.0, 1, 1, 0.0, beamRotation);
final mtx = rot.getMatrix();
canvas.transform(mtx);
Now the axis is [1.0, 1.0, 0.0] and the rotation point is [79.5, 170.7, 0.0] which is one of the corners that stay in the sample place during the rotation. We supply the beamRotation parameters which changes from Pi to 0 during the animation:
//frames 63-102, modified
beamRotation = Tween<double>(begin: math.pi, end: 0).animate(
  CurvedAnimation(
    parent: animationController,
    curve: Interval(
      63 / tf * animLimit, //tf is total animation frame count
      110 / tf * animLimit, //animLimit is interval of the animation taken by this tween
      curve: Curves.easeInOutQuad,
    ),
  ),
);
Let’s see how the animation would look like without this rotation. Strange, isn’t it?
In the animation above you can also notice all the other small changes applied to the middle beam during its animation. The top corners are offset additionally to fake the perspective change and the whole element is scaled a bit when the animation finishes.
Clipping paths in Flutter
Very important part of the Flutter logo animation is clipping. The movement is much more dynamic thanks to approaching and revealing animations of the 3 beams.
I used several clipping paths and rectangles that are animated with separate tweens. In the CodePen you can enable drawing the clipping paths in the options menu. Take a look at the gif below and see 3 of them (red, green and yellow).
Each of them corresponds to different element (layer) of the logo. The object is drawn only if it’s within the bounds of the clipping path.
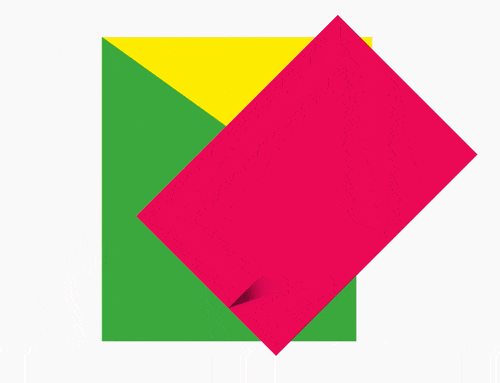
One important remark is that if you want to clip the object with custom path, you have to call canvas.clipPath() before drawing the path. In the snippet below you can see how the middle path was clipped with clippingPath. Note that there are variables used that change based on the animation progress (distance, xDistance). Take a look at the source code for more information.
canvas.save();

final Path middleBeam = Path()
  ..moveTo(
      156.2 + topCornerPerspectiveOffset, 94.0 - topCornerPerspectiveOffset)
  ..lineTo(100.4 + bottomCornerPerspectiveOffset,
      94.0 - topCornerPerspectiveOffset)
  ..lineTo(51.6, 142.8)
  ..lineTo(79.5, 170.7);

final clippingPath = Path()
  ..moveTo(79.5 + distance + margin, 170.7 - distance + margin)
  ..lineTo(107.4 + xDistance + margin + alongMargin,
      142.8 - xDistance + margin - alongMargin)
  ..lineTo(79.5 + xDistance - margin + alongMargin,
      114.9 - xDistance - margin - alongMargin)
  ..lineTo(51.6 + distance - margin, 142.8 - distance - margin);

canvas.clipPath(clippingPath);
canvas.drawPath(middleBeam, lightPaint);
canvas.restore();
Take note that I added some manual adjustments for fake perspective with topCornerPerspectiveOffset and bottomCornerPerspectiveOffset. This was done by eye-balling the correct behavior of the shape when falling down onto canvas.
Summary
After several days I was more or less satisfied with the result. There are still some spots that could be improved and the general code quality could be better (e.g. extracting animations to separate custom controller, not recalculating some invariant animation properties on each frame).
If you reached this part of the article I would like to thank you and suggest that you try similar challenge for yourself. Announcement of CodePen support for Flutter opened new range of creative possibilities that previously were available only for people with own websites. After couple of weeks we can see dozens of awesome Flutter designs being published. Maybe yours will be next?
Links
- this animation source code on GitHub
- this animation on CodePen
- matrix_rotate_arbitrary_axis - library allowing to rotate point around arbitrary matrix
- Glenn Murray’s article
- CodePen support for Flutter announcement
- my profile on CodePen
- my profile on Twitter - follow to be notified about new Flutter challenges