Platform Views for Mobile and Beyond
At some point in the project it may happen that you need to use platform specific SDK that does not yet have a plugin available. And what’s more difficult you may want to display some of the vendor-provided UI components instead of writing your own. Take for example camera-based heart rate scanner or advanced video editor. They may look perfectly fine in native Android or iOS app, but obviously you want to use them in Flutter. Here’s a moment when you can use platform views.
In this article we’re going to go through basics of platform views, their benefits and limitations, as well as we’ll look into displaying them on platforms that are not yet officially supported. Let’s dig in!
This article is pretty bulky as I wanted it to be a comprehensive lookup doc for myself 🤪. Some information may be easily found in the official (splendid) docs, other is just my personal findings and opinion. Feel free to jump to a specific section using the table of contents.
How Platform Views are Displayed
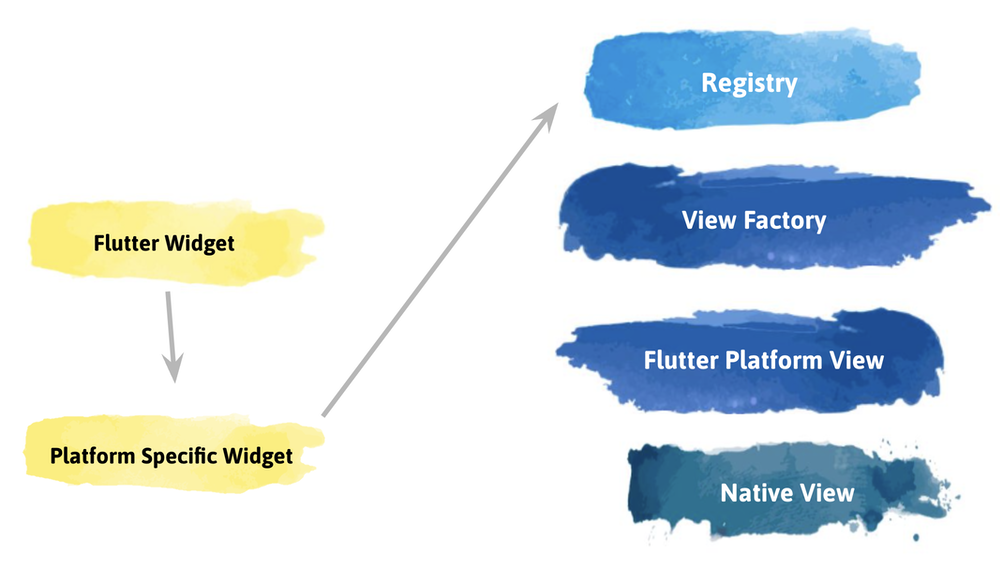
When trying to understand how platform views are getting displayed in Flutter it’s worth to look at this in a simplified form first. Below you see some of the main pieces necessary to display a platform view with no iOS or Android specifics.
Anytime you want to display a native view you’ll start with your custom widget wrapper (in this case referred to as Flutter Widget). It’s going to render a UiKitView on iOS or PlatformViewLink on Android that come from Flutter’s widgets library.
On the native side you will need to use plugin (view) registry to register your view factory that will be responsible for providing a Flutter PlatformView implementation. The specific implementation will have to render a corresponding view for a given platform (UIView for iOS/macOS, View for Android).
iOS
We’ll start with iOS as the setup here is the most straightforward. There’s only one type of platform views that we can use on iOS and it uses a method called hybrid composition.
Hybrid composition is the platform view rendering mode where the view is appended to the view hierarchy. If you’d open Xcode’s view debugging utility you’d see the native UIKit view hovering above the FlutterViewController.
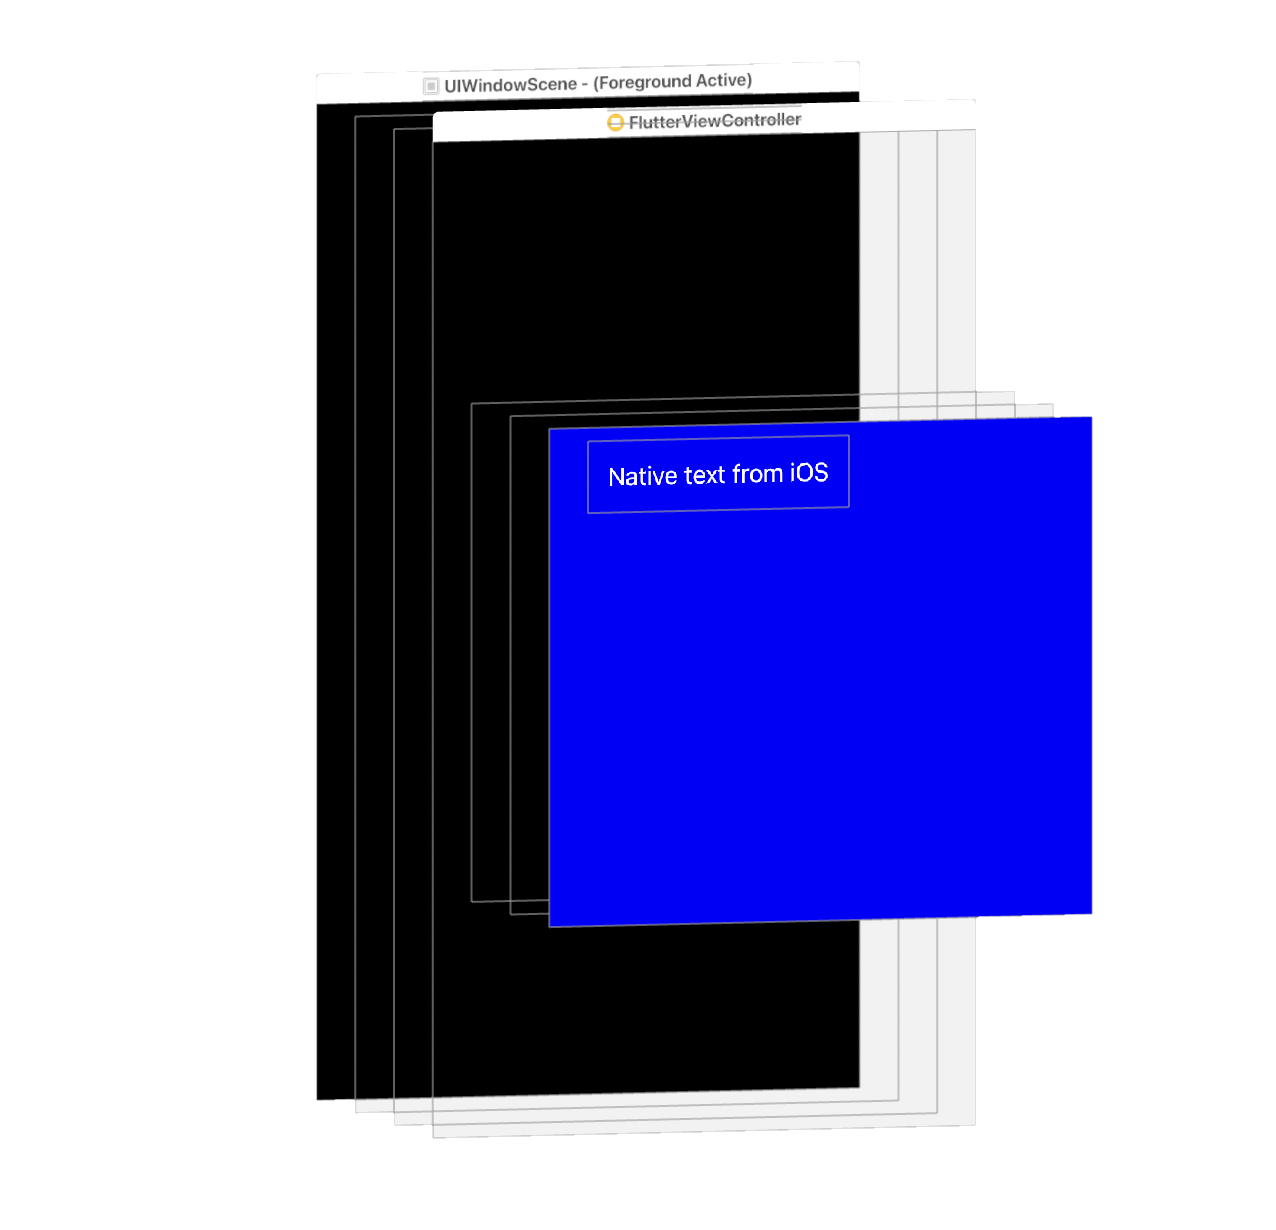
This approach has some obvious benefits. For instance, iOS is aware of the view features such as accessibility. It can handle gestures and text input properly. As you may imagine, when Apple releases some new features such as Apple Pencil scribble support, it may take some time to fully support that in Flutter. By leveraging native views we can get some of that at relatively low cost. One of the best examples may be flutter_native_text_input library that lets us use system-specific text fields instead of rendering them with Flutter. It’s definitely not the most seamless experience, but I can imagine situations when there is no better workaround than falling back to UITextView.

Sign up to my newsletter
To make it easier to never miss a new blog post, I decided to start a simple newsletter. It's called Occasional Flutter and I invite you to subscribe today!
How to implement an iOS view in Flutter?
In this tutorial we’ll go through some major steps when it comes to creating a native view in Flutter. I’d like us to follow decent practices of building plugins (practically speaking the native view is a form of plugin), so to get a head start we’re going to use a federated plugin template and plugin_platform_interface. This way the resulting code will be much easier to extend to other platforms.
If you’d like to see a more complex example of native view that is being migrated to a federated plugin template, have a look at the webview migration design document.
The goal
To make it easier to follow, for now we’ll just show a couple of native labels. Later on we’ll move to something more exciting, but there’s still a bit of code to go through before we can display meaningful elements on the screen.
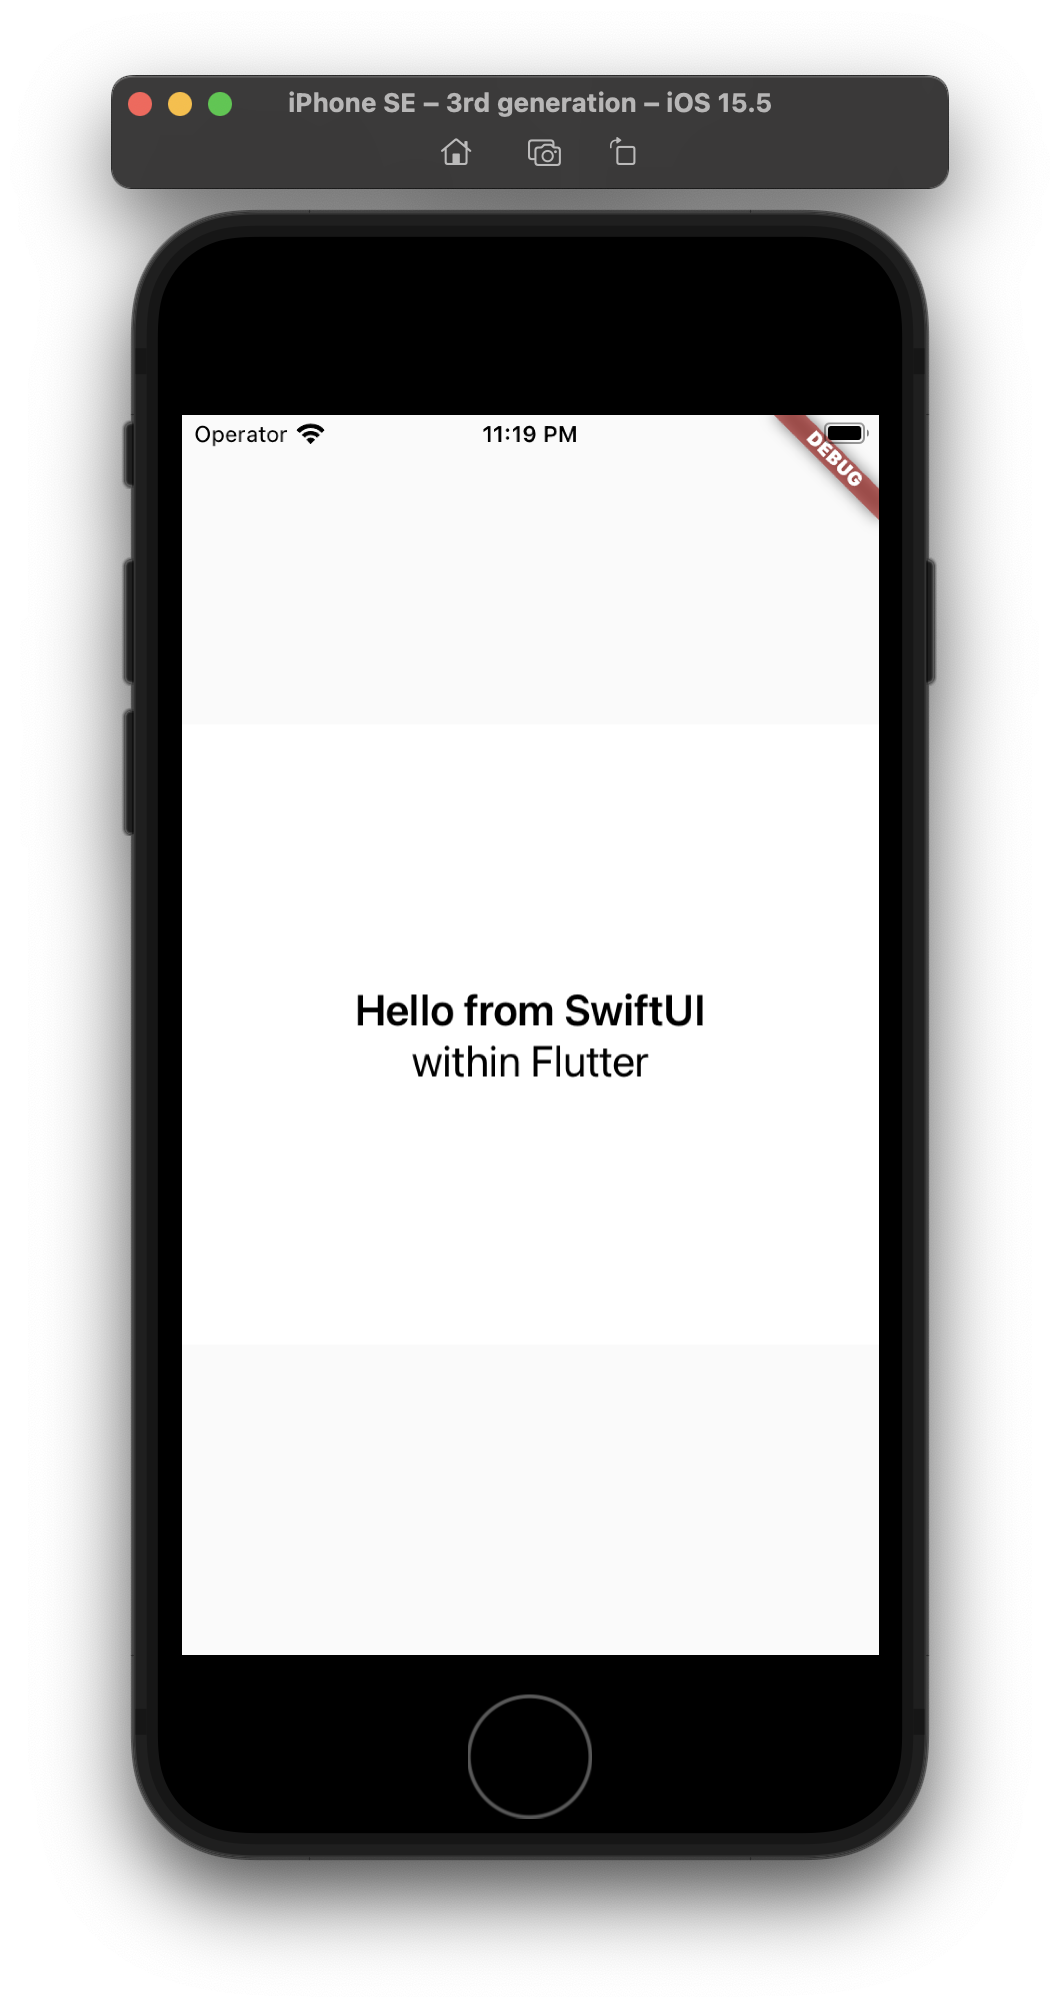
For iOS our goal is to display a SwiftUI stack. It’s still a UIKit view, but it’s hosting a SwiftUI controller that allows us to write layout code in a more declarative way.
Setup
To make your life even easier you can generate the plugin template code via the very_good_cli. Once done you should see structure similar to following:
- Dart platform agnostic code in the main package
- Platform specific code in the packages per each platform
- Common plugin interface defined in
PlatformInterface - Example application
Using PlatformInterface class from plugin_platform_interface package helps to keep consistent API between platforms and prevents usage of extends in favor of implements when implementing platform code.
In my case I started with defining the Widget getPlatformView() method in the PlatformInterface and putting placeholders in every platform package. This way I will be forced to keep consistent API between all the platforms. Then in my Dart package I defined a common widget that I will display in my app called NativeView.
// camera_view/camera_view_platform_interface/lib/camera_view_platform_interface.dart

/// The interface that implementations of camera_view must implement.
abstract class CameraViewPlatform extends PlatformInterface {
...
  /// Returns the platform specific widget
  Widget getPlatformView();
}
// camera_view/camera_view/lib/camera_view.dart

CameraViewPlatform get _platform => CameraViewPlatform.instance;

class NativeView extends StatelessWidget {
  const NativeView({super.key});

  @override
  Widget build(BuildContext context) {
    return _platform.getPlatformView();
  }
}
If you’d build the app now, it would just fail. Let’s move on to implementing the iOS view on the Dart side.
iOS view - Dart side
The Dart implementation for a view is fairly straightforward. The UiKitView is a widget that wraps PlatformViewLayer with a user-friendly API. The most important argument is viewType that needs to be reused in the Swift code as well.
As mentioned before there’s only one way to render a platform view on iOS, so we don’t have to worry about the logic here.
class _UiKitBox extends StatelessWidget {
  const _UiKitBox({super.key});

  @override
  Widget build(BuildContext context) {
    // This is used in the platform side to register the view.
    const viewType = '@views/native-view';
    // Pass parameters to the platform side.
    final creationParams = <String, dynamic>{};
    return UiKitView(
      viewType: viewType,
      layoutDirection: TextDirection.ltr,
      creationParams: creationParams,
      gestureRecognizers: const <Factory<OneSequenceGestureRecognizer>>{
        Factory<OneSequenceGestureRecognizer>(
          EagerGestureRecognizer.new,
        ),
      },
      creationParamsCodec: const StandardMessageCodec(),
    );
  }
}
To expose _UiKitBox outside of the package the getPlatformView() method can be used. This way consumers of the package won’t be affected when the implementation details change.
class NativeViewIOS extends CameraViewPlatform {
  // …

  @override
  Widget getPlatformView() {
    return const _UiKitBox();
  }
}
iOS - Swift side
To conveniently edit Swift code you should open the example app in Xcode (specifically Runner.xcworkspace file). I tend to use command line for that by calling
open native_view/native_view/example/ios/Runner.xcworkspace/
Make sure to run flutter pub get and pod install for the app iOS project and head off to the plugin code. That’s what usually makes me laugh as you have to go through several levels of folders in order to access Swift files of your plugin.
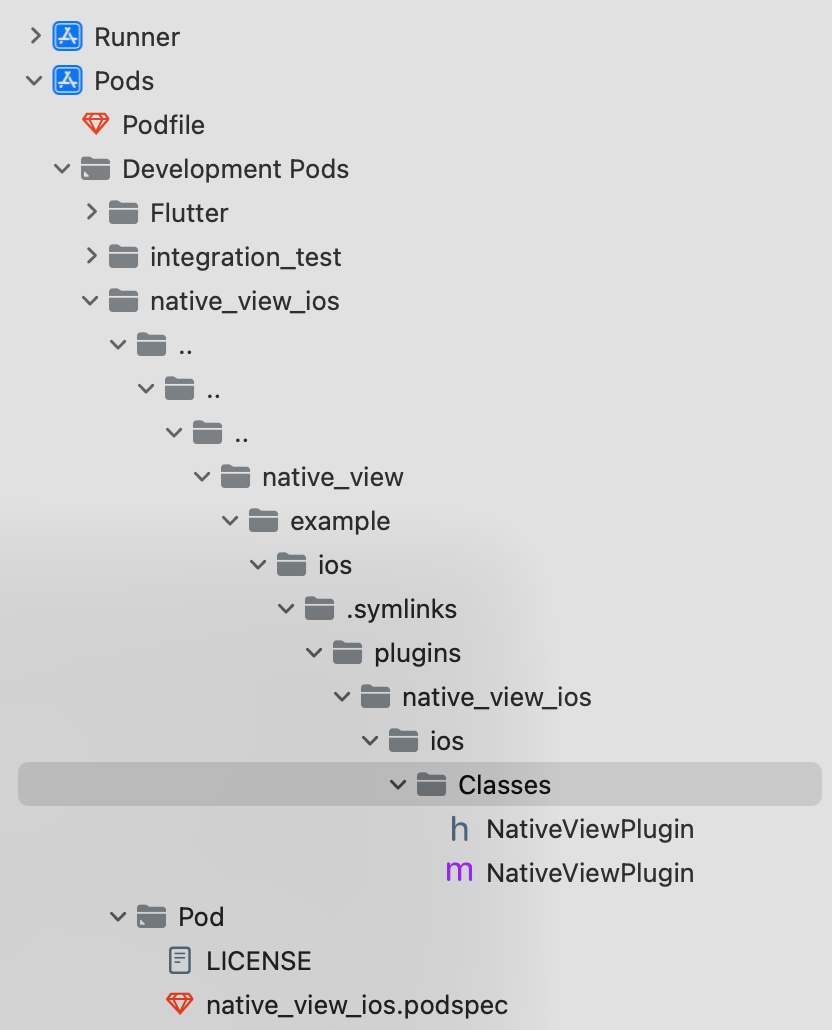
At the moment very_good_cli generates Obj-C code, but you should be able to easily add Swift files instead by modifying the podspec and adding the file like follows:
Replace content of NativeViewPlugin.m
#import "NativeViewPlugin.h"
#if __has_include(<native_view_ios/native_view_ios-Swift.h>)
#import <native_view_ios/native_view_ios-Swift.h>
#else
// Support project import fallback if the generated compatibility header
// is not copied when this plugin is created as a library.
// https://forums.swift.org/t/swift-static-libraries-dont-copy-generated-objective-c-header/19816
#import "native_view_ios-Swift.h"
#endif

@implementation NativeViewPlugin
+ (void)registerWithRegistrar:(NSObject<FlutterPluginRegistrar>*)registrar {
  [SwiftNativeViewPlugin registerWithRegistrar:registrar];
}
@end
And add Swift implementation:
import Flutter
import UIKit

@available(iOS 13.0, *)
public class SwiftNativeViewPlugin: NSObject, FlutterPlugin {
  public static func register(with registrar: FlutterPluginRegistrar) {
    let channel = FlutterMethodChannel(name: "native_view_ios", binaryMessenger: registrar.messenger())
    let instance = SwiftNativeViewPlugin()
    registrar.addMethodCallDelegate(instance, channel: channel)
  }

  public func handle(_ call: FlutterMethodCall, result: @escaping FlutterResult) {
    switch call.method {
    case "getPlatformName":
      result("iOS")
    default:
      result(FlutterMethodNotImplemented)
    }
  }
}
Once you have your Swift environment prepared you should be able to start writing some platform views code. For this example I wanted to try out embedding a SwiftUI view within Flutter. In order to do that a UIHostingController can be used.
Firstly, the view factory needs to be registered in the FlutterPluginRegistrar, obviously in the method called register().
let factory = FLNativeViewFactory(messenger: registrar.messenger)

registrar.register(factory, withId: "@views/native-view")
The implementation of FLNativeViewFactory is mostly a boilerplate, where in the create function we need to return the displayed view:
@available(iOS 13.0, *)
class FLNativeViewFactory: NSObject, FlutterPlatformViewFactory {
    private var messenger: FlutterBinaryMessenger

    init(messenger: FlutterBinaryMessenger) {
        self.messenger = messenger
        super.init()
    }

    func create(
        withFrame frame: CGRect,
        viewIdentifier viewId: Int64,
        arguments args: Any?
    ) -> FlutterPlatformView {
        return FLNativeView(
            frame: frame,
            viewIdentifier: viewId,
            arguments: args,
            binaryMessenger: messenger)
    }
}
The most interesting part is FLNativeView which will host the SwiftUI view:
@available(iOS 13.0, *)
class FLNativeView: NSObject, FlutterPlatformView {
    private var _view: UIView

    init(
        frame: CGRect,
        viewIdentifier viewId: Int64,
        arguments args: Any?,
        binaryMessenger messenger: FlutterBinaryMessenger?
    ) {
        _view = UIView()
        super.init()
        _view.backgroundColor = UIColor.gray
        let childView = UIHostingController(rootView: SwiftUIView())
        childView.view.frame = frame
        _view.addConstrained(subview: childView.view)
        childView.didMove(toParent: _view.inputViewController)
    }

    func view() -> UIView {
        return _view
    }
}
I took some inspiration from this StackOverflow answer to fix the constraints issue.
The SwiftUIView is a pretty straightforward layout and I placed it in a separate file to use Xcode preview
import SwiftUI

@available(iOS 13.0, *)
struct SwiftUIView: View {
    var body: some View {
        VStack(alignment: .center) {
            Text("Hello from SwiftUI")
                .font(.headline)
            Text("within Flutter")
                .font(.body)
        }
    }
}

@available(iOS 13.0, *)
struct SwiftUIView_Previews: PreviewProvider {
    static var previews: some View {
        SwiftUIView()
    }
}
iOS - performance
What’s really surprising - at least knowing some stereotypes about embedding native views - the performance is pretty impressive. In a much more complex case built internally we were able to max out the frame rate of the native view, and with a simple case of a confetti animation we’re getting also super smooth effect.

Android
The world of Android is a bit more complicated than the iOS. There are differences between various vendors and Android versions. Sometimes you may think that your platform view implementation works just fine on your test device but then there may be some odd device with more problems than you could ever imagine.
To spice things up a little bit, there was a major change introduced in Flutter 3.0. It changed the logic of which mode was used depending on Android version and device capabilities.
It seems that this change has introduced several serious bugs in how the Android platform view was displayed (e.g. wrong position, ghosting of the Flutter view, crashes, or scrolling jittering performance).
Unfortunately, it wasn’t widely announced so many people haven’t realized that there are some issues until they actually run their app on the latest version of Flutter. I was in the same situation where we had to choose whether we want to migrate to Flutter 3.0 or stay at the older version. Happily, three have been some fixes since then (e.g. for webview), so if you were stuck at Flutter 2 due to platform views issues, give the newest version a try and verify if they are still present.
Types of embedding
In this section I may use some abbreviations to make reading easier. The Flutter team came up with following terms for platform view modes:
- Virtual Display (VD)
- Hybrid Composition (HC)
- Texture Layer Hybrid Composition (TLHC)
This section may require some updates soon™️, as there is ongoing refactoring of the selection logic for platform views on Android. This is valid for master, 3.5.0-10.0.pre.36. There are some pending issues with hybrid composition on Android that you may want to be aware.
Virtual Display
This is the simplest mode of them all. It poses several limitations around accessibility (e.g. you wouldn’t use it as webview). Starting from Flutter 3.x it’s going to be a fallback mode for TLHC if the device does not support that – from what I understand Android 12+ does not support VD.
To use that you can simply instantiate the AndroidView widget.
@override
Widget getPlatformView() {
  return const AndroidView(
    viewType: '@views/native-view',
    layoutDirection: TextDirection.ltr,
    creationParams: <String, dynamic>{},
    creationParamsCodec: StandardMessageCodec(),
  );
}
When you try to inspect the views of the Flutter app with Android Studio Layout Inspector you won’t see anything (although this may be Inspector’s issue as well). The Android view is invisible to the debugger.
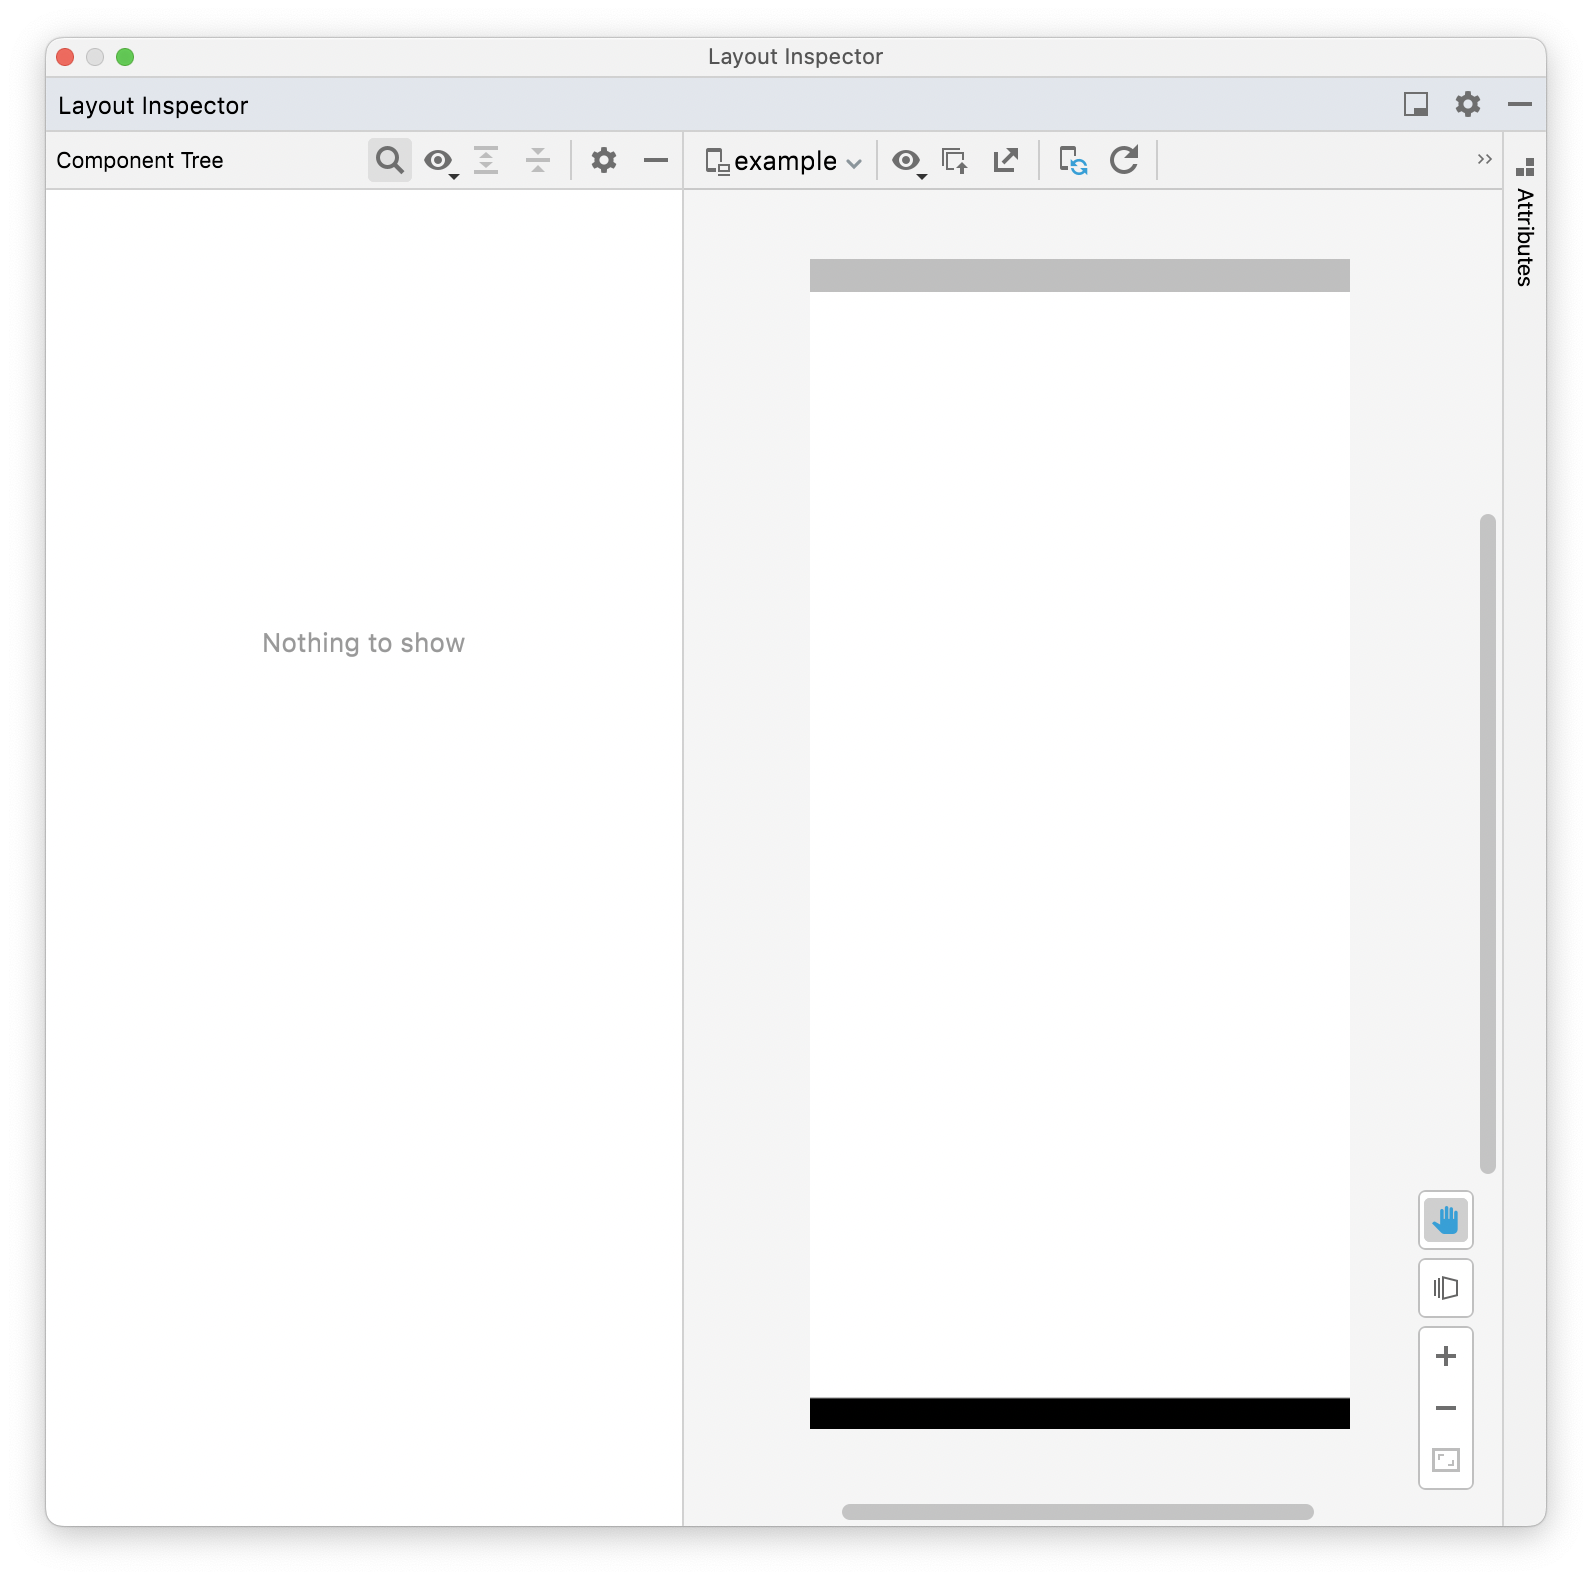
Virtual Display is used also after invoking initAndroidView() when using PlatformViewsService within PlatformViewLink. The AndroidView widget is a shortcut with less customization compared to AndroidViewSurface.
Hybrid Composition
To use this mode you have to employ PlatformViewLink widget. Instead of returning AndroidView you can return AndroidViewSurface in its surfaceFactory. Then when creating the view you should pass viewType and other parameters to PlatformViewsService.initExpensiveAndroidView().
Why is this expensive? Let’s have a look at the docs:
When this factory is used, the Android view and Flutter widgets are composed at the Android view hierarchy level.
Using this method has a performance cost on devices running Android 9 or earlier, or on underpowered devices. In most situations, you should use [initAndroidView] or [initSurfaceAndroidView] instead.
The Dart code for this piece is not as brief:
@override
Widget getPlatformView() {
  return PlatformViewLink(
    viewType: '@views/native-view',
    surfaceFactory: (context, controller) {
      return AndroidViewSurface(
        controller: controller as AndroidViewController,
        gestureRecognizers: const <Factory<OneSequenceGestureRecognizer>>{},
        hitTestBehavior: PlatformViewHitTestBehavior.opaque,
      );
    },
    onCreatePlatformView: (params) {
      return PlatformViewsService.initExpensiveAndroidView(
        id: params.id,
        viewType: '@views/native-view',
        layoutDirection: TextDirection.ltr,
        creationParams: <String, dynamic>{},
        creationParamsCodec: const StandardMessageCodec(),
        onFocus: () {
          params.onFocusChanged(true);
        },
      )
        ..addOnPlatformViewCreatedListener(params.onPlatformViewCreated)
        ..create();
    },
  );
}
Let’s revisit the usage of PlatformViewLink. Depending on the callback selected in the onCreatePlatformView a different mode will be used:
initSurfaceAndroidViewwill fallback toinitAndroidView, it (maybe) will get deprecated in favor ofinitAndroidViewentirely,initAndroidViewwill useTextureViewand TLHC, but may fallback to VD on some devices (e.g. when SDK <23), cannot handle SurfaceViewinitExpensiveAndroidViewwill use Hybrid Composition
When you try to inspect the views of the Flutter app with Android Studio Layout Inspector you can see the overall structure of the Flutter app from the point of view of Android. The native view is accessible to the debugger.
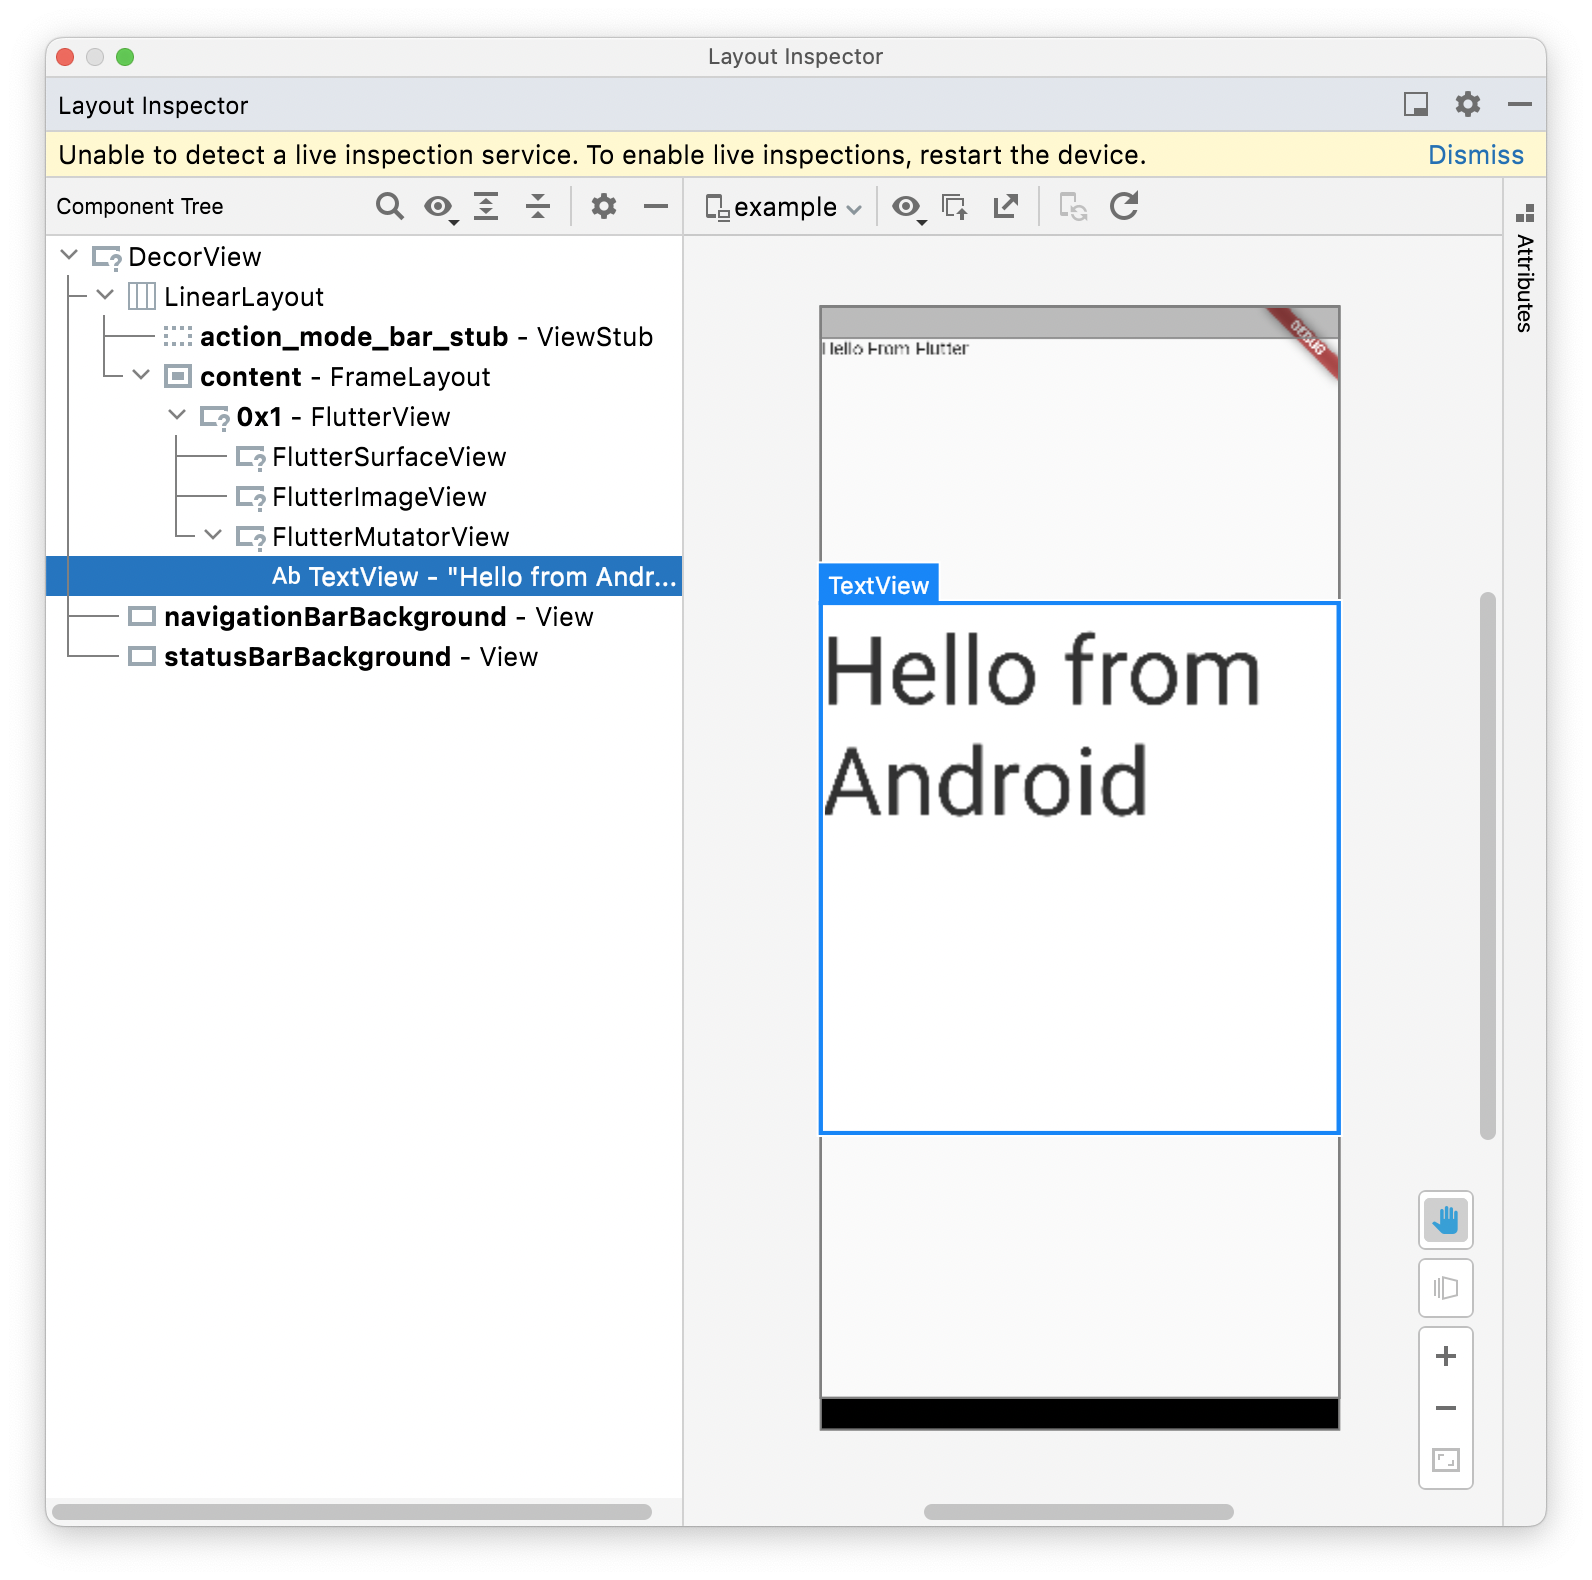
Texture Layer Hybrid Composition
This is a new mode introduced in Flutter 3.0, and has been getting fixes for last couple of months. As of writing this article it’s still not clear what will be the final logic when selecting this mode (the docs are not clear), but in general it aims to solve a lot of the performance problems with simple AndroidView widgets.
When this PR lands, it will fallback to Hybrid Composition instead of Virtual Display when using initSurfaceAndroidView, as this seems as more predictable approach for the developers. It should fallback to Virtual Display when initAndroidView is used.
Some interesting sources that I used:
- Issue describing logic improvements
- webview_flutter and google_maps,
- PR with new selection logic
- Hybrid Composition breaks the accessibility of the native view
Android - Kotlin side
The Kotlin side of the implementation is similar to the iOS. In the plugin initialization code the view needs to be registered, this time in the platformViewRegistry:
override fun onAttachedToEngine(
   @NonNull flutterPluginBinding: FlutterPlugin.FlutterPluginBinding
) {
   channel = MethodChannel(flutterPluginBinding.binaryMessenger, "camera_view_android")
   channel.setMethodCallHandler(this)
   context = flutterPluginBinding.applicationContext

   flutterPluginBinding
       .platformViewRegistry
       .registerViewFactory("@views/native-view", NativeViewFactory())
}
The PlatformViewFactory code is relatively straightforward as well, as it only returns NativeView:
class NativeViewFactory(val cameraController: CameraController) :
   PlatformViewFactory(StandardMessageCodec.INSTANCE) {
   override fun create(context: Context, viewId: Int, args: Any?): PlatformView {
       val creationParams = args as Map<String?, Any?>?
       return NativeView(context, viewId, creationParams, cameraController)
   }
}
internal class NativeCameraView(context: Context, id: Int, creationParams: Map<String?, Any?>?) : PlatformView {
   private val textView: TextView

   override fun getView(): View {
       return textView
   }

   init {
       textView = TextView(context)
       textView.textSize = 72f
       textView.text = "Hello from Android"
   }
}
macOS
Despite the fact that platform views are not supported on desktop yet, there’s already some basic functionality available on master channel of Flutter. In practice the implementation from iOS can be reused in the macOS plugin code as well. The main difference is that FlutterMacOS framework needs to be used instead of Flutter (but it should be unified in the future anyway).
Few things don’t work as of writing this article:
- gestures are not handled entirely on the native side, the method channels are not implemented
- there’s an annoying bug with threading with a pending fix, but it prevents users from modifying the window size, while the platform view is shown
- the platform view is shown above the widget tree, so you cannot show any custom UI, plus the navigation animation is broken as well
As you can see, there’s no real support for the desktop platform views right now. However, if you ever thought about showing any native view in Flutter macOS application, this is the time to start experimenting with that. The cool thing though, is that I was able to show almost exactly the same view as on iOS with very little changes to syntax or imported libraries.
Types of rendering
Let’s recap all the types of view rendering/composition available in Flutter as of version 3.0/3.3. Currently only Android, iOS, and Web are officially supported, although the last one has relatively limited feature set. Desktop platforms (Windows, Linux, and macOS) are still work-in-progress. Recently, there has been some progress e.g. on macOS it’s already possible to display PlatformView using Flutter master (as of August 2022).
| Platform | Type | Details |
|---|---|---|
| iOS | Hybrid Composition | Appends view to the hierarchy |
| Android | Virtual Display | Limited in a11y, no gestures handling, morphed into the Flutter view min SDK 20 |
| Hybrid Composition | Appends view to the hierarchy performance cost on Android <10 min SDK 19 |
|
| Texture Layer Hybrid Composition | Added in Flutter 3, improved in 3.3 Doesn't work with SurfaceView Fallbacks to VD or HC (depends) |
|
| Web | HTML slots | Uses HtmlElementView for embedding the view |
| macOS | ? | Basic support for platform views, not production ready |
| Windows | No support yet |
Camera example
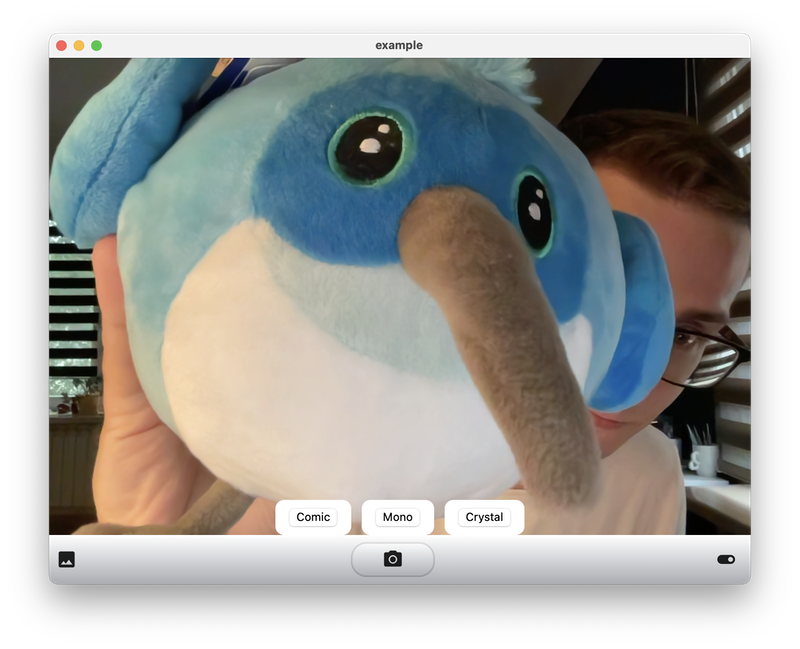
One of the goals while writing this article was to show a camera preview on at least 3 platforms. I’m happy to share that it was possible to do. I won’t get too much into the details here, but thanks to the similarities between iOS and macOS platform view implementation, as well as by leveraging SwiftUI I was able to mostly copy-and-paste the plugin code from iOS to macOS to get basic camera working.
Check out the example camera app
The iOS and macOS implementations use SwiftUI camera views from this article by Yono Mittlefehldt. The license note is included in every file copied from the original implementation.
The Android implementation uses CameraView library, which worked perfectly fine for this sample.

I’m quite happy with the final result, although it’s definitely not ready to use outside of demo environment. The journey I took shows that it’s going to be relatively easy to embed native views across all the platforms supported by Flutter. It’s not there yet, but I’m really hopeful and looking forward to see plugins like webview, video player or PDF readers on desktop platforms.